
Docker is an indispensable tool for modern software engineering, containerization, and microservices deployment. However, as you build, run, and iterate on applications, Docker silently accumulates leftover assets—dangling images, stopped containers, abandoned networks, and anonymous volumes. Over time, these orphaned artifacts can easily consume dozens or even hundreds of gigabytes, triggering zero-disk-space errors on development machines and CI/CD build nodes.
Understanding how to clean up unused Docker images, containers, and volumes to free disk space is essential for keeping your Docker host lightweight, fast, and stable. In this comprehensive guide, we will cover the underlying causes of Docker disk bloat and step through safe, practical commands to reclaim your storage.
Key Takeaways
- Primary Cause of Bloat: Docker never deletes unused resources automatically when containers stop or builds finish; images, volumes, and dangling layers remain cached indefinitely until explicitly removed.
- The One-Command Cleanup: Running
docker system pruneremoves stopped containers, unused networks, and dangling images in a single step. - Persistent Volume Caution: Anonymous volumes often hold vast amounts of wasted disk space, but deleting them permanently removes persistent data—always inspect before purging with
docker volume prune. - Zero-Downtime Safe Practice: Use the
--filter "until=24h"flag during automated cleanup routines to avoid removing recently generated assets currently needed by deployment pipelines. - Proactive Prevention: Pass the
--rmflag todocker runduring short-lived container sessions to ensure instant, automatic cleanup upon process completion.
Step 1: Diagnose What Is Using Your Docker Storage Space
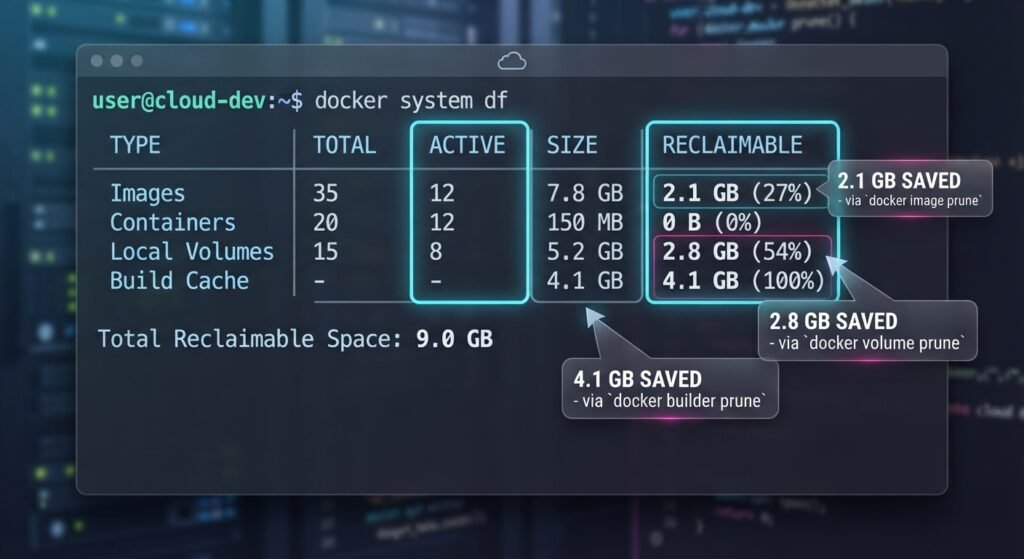
Before deleting any assets, inspect how Docker is allocating space across images, containers, local volumes, and build cache.
Run the built-in system disk usage command:
Bash
docker system df
Detailed Storage Breakdown
To identify specific dangling and reclaimable items, add the verbose flag:
Bash
docker system df -v
This output will highlight:
- Dangling Images: Unnamed images marked as
<none>:<none>resulting from newer image builds. - Stopped Containers: Exited container instances that still retain their read-write layer state.
- Unused Volumes: Volumes created by containers that are no longer referenced by any active process.
Step 2: Clean Up Unused Docker Containers
Stopped containers remain stored on disk along with any modified filesystem layers created during their runtime.
Remove Specific Stopped Containers
To view all stopped containers:
Bash
docker ps -a -f status=exited
To remove a specific container by ID or name:
Bash
docker rm <container_id_or_name>
Bulk Remove All Stopped Containers
To instantly purge every stopped container across the host:
Bash
docker container prune
Pro Tip: To automatically delete containers as soon as they exit, always add the
--rmflag when launching temporary testing or background scripts:Bash
docker run --rm -d nginx
Step 3: Remove Unused and Dangling Docker Images
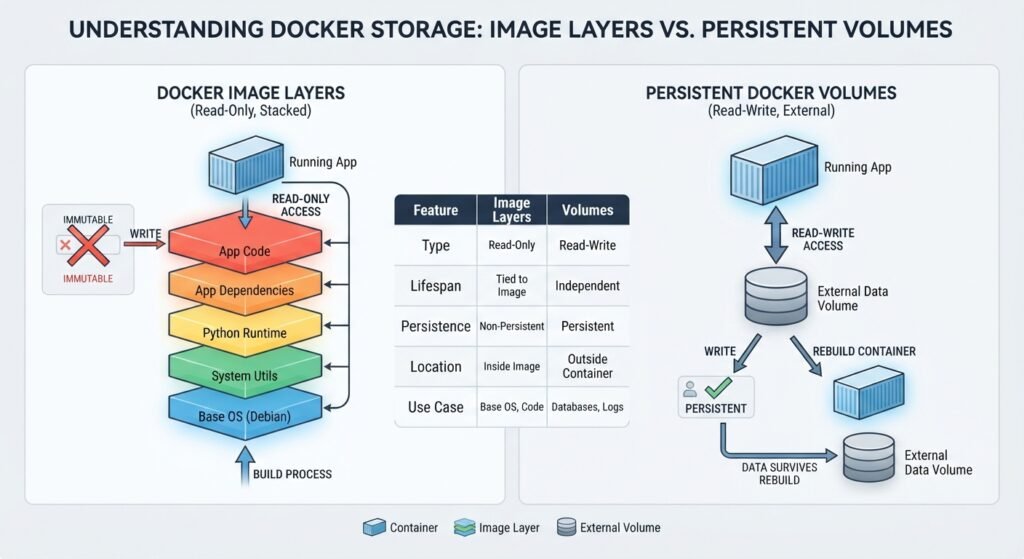
Docker images are composed of stacked layers. When you rebuild an image with the same tag, the old layers are untagged rather than deleted, becoming “dangling” images.
Delete Dangling Images Only
Dangling images have no tag and display as <none> in docker images. Safely remove them with:
Bash
docker image prune
Delete All Unused Images
If you want to remove all images that are not actively associated with at least one running container (not just dangling ones):
Bash
docker image prune -a
Step 4: Purge Unused Docker Volumes Safely
Docker volumes store persistent database states and application uploads separately from the container lifecycle. Because volumes contain critical data, Docker avoids deleting them unless explicitly commanded.
However, running docker-compose down without specific parameters frequently leaves behind orphaned “anonymous” volumes that silently hoard storage.
Inspect Volumes Before Deleting
List all existing volumes on the system:
Bash
docker volume ls
Filter specifically for volumes not attached to any container:
Bash
docker volume ls -f dangling=true
Remove All Unused Volumes
To reclaim volume disk space across all unattached volumes:
Bash
docker volume prune
Step 5: The Ultimate All-in-One Cleanup (docker system prune)
When you need an all-encompassing system cleanup to free disk space immediately, use docker system prune.
Standard System Prune
By default, this command removes:
- All stopped containers
- All networks not used by at least one container
- All dangling images (
<none>:<none>) - All build cache layers
Bash
docker system prune
Deep System Cleanup (Including Volumes and Unused Images)
To trigger a comprehensive cleanup that also purges unused volumes and all unreferenced images, pass the --all and --volumes flags:
Bash
docker system prune -a --volumes

Step 6: Automate Docker Maintenance with Filters and Cron
To avoid manual disk space emergencies in production or CI/CD runner environments, automate your Docker maintenance with safety filters.
Apply Age Filters to Cleanup Commands
Prevent deleting recently created containers or images that might still be part of active deployment stages:
Bash
# Only remove items older than 24 hours
docker system prune -a --force --filter "until=24h"
Set Up a Weekly Maintenance Cron Job
Add a scheduled task to your system’s crontab (crontab -e) to automatically execute a lightweight Sunday night cleanup:
Bash
0 2 * * 0 /usr/bin/docker system prune -f --filter "until=168h" > /dev/null 2>&1
Conclusion
Learning how to clean up unused Docker images, containers, and volumes to free disk space is a vital skill for maintaining high-performing development environments and production servers. By integrating simple diagnostic commands like docker system df alongside targeted removal tools like docker container prune and docker volume prune, you can prevent storage exhaustion and keep your container infrastructure operating smoothly.
Frequently Asked Questions (FAQs)
Will running docker system prune delete my running containers or active data?
No, docker system prune strictly targets inactive and unreferenced resources. Any container currently in a running or paused state, along with its attached images and active networks, will remain untouched.
Why didn’t docker system prune free up disk space on Docker Desktop (Mac/Windows)?
On macOS and Windows, Docker runs inside a virtual machine (VM) with a fixed virtual disk size (Docker.raw or vdisk.vhdx). While pruning deletes files inside the VM, the operating system may not shrink the virtual disk file automatically. You may need to run disk compaction or trim utilities within Docker Desktop settings to reclaim host OS space.
What is the difference between docker image prune and docker image prune -a?
docker image prune removes only “dangling” images (untagged layers showing <none>:<none>). In contrast, docker image prune -a deletes all dangling images plus any tagged image that is not currently used by an active running container.
How do I remove the Docker build cache to free up extra disk space?
Docker BuildKit stores build cache layers to accelerate future image builds. Over time, this cache can grow significantly. You can clean it up independently without affecting images using:
Bash
docker builder prune
1 thought on “How to Clean Up Unused Docker Images, Containers, and Volumes to Free Disk Space”